Grafana에서 ClickHouse 데이터 소스 구성
구성을 수정하는 가장 쉬운 방법은 Grafana UI에 있는 플러그인 구성 페이지에서 작업하는 것이지만, 데이터 소스는 YAML 파일로 프로비저닝할 수도 있습니다.
이 페이지에서는 ClickHouse 플러그인에서 구성할 수 있는 옵션 목록과 함께, YAML로 데이터 소스를 프로비저닝하는 경우 사용할 수 있는 구성 스니펫을 제공합니다.
모든 옵션에 대한 간단한 개요가 필요하다면, 전체 구성 옵션 목록을 여기에서 확인할 수 있습니다.
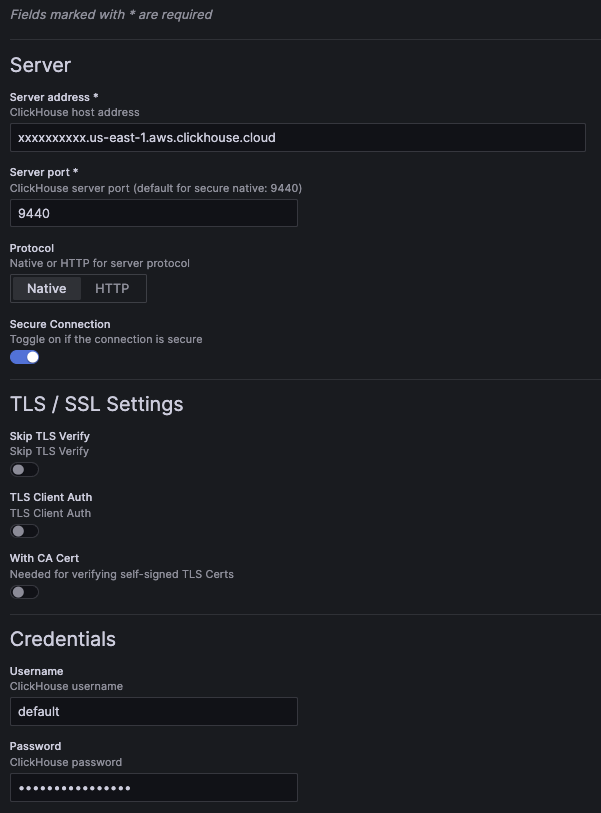
공통 설정
구성 예시 화면:
공통 설정을 위한 YAML 구성 예시:
jsonData:
  host: 127.0.0.1 # (required) server address.
  port: 9000      # (required) server port. For native, defaults to 9440 secure and 9000 insecure. For HTTP, defaults to 8443 secure and 8123 insecure.

  protocol: native # (required) the protocol used for the connection. Can be set to "native" or "http".
  secure: false    # set to true if the connection is secure.

  username: default # the username used for authentication.

  tlsSkipVerify:     <boolean> # skips TLS verification when set to true.
  tlsAuth:           <boolean> # set to true to enable TLS client authentication.
  tlsAuthWithCACert: <boolean> # set to true if CA certificate is provided. Required for verifying self-signed TLS certificates.

secureJsonData:
  password: secureExamplePassword # the password used for authentication.

  tlsCACert:     <string> # TLS CA certificate
  tlsClientCert: <string> # TLS client certificate
  tlsClientKey:  <string> # TLS client key
UI에서 구성을 저장하면 version 속성이 추가됩니다. 이 속성은 구성이 저장될 때 사용된 플러그인 버전을 나타냅니다.
HTTP protocol
HTTP 프로토콜을 통해 연결하도록 선택하면 추가 설정 옵션이 표시됩니다.
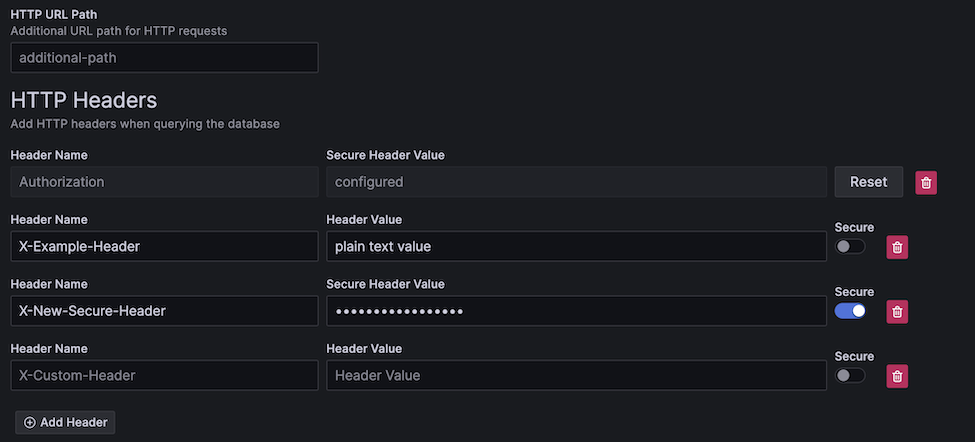
HTTP path
HTTP 서버가 다른 URL 경로에서 서비스되는 경우, 여기에서 해당 경로를 추가할 수 있습니다.
jsonData:
  # excludes first slash
  path: additional/path/example
서버로 전송되는 요청에 사용자 정의 헤더를 추가할 수 있습니다.
헤더는 일반 텍스트 헤더이거나 보안 헤더일 수 있습니다.
모든 헤더 키는 일반 텍스트로 저장되며, 보안 헤더 값은 password 필드와 유사하게 보안 구성(secure config)에 저장됩니다.
HTTP를 통한 보안 값 전송
보안 헤더 값은 구성에서 안전하게 저장되지만, 보안 연결이 비활성화된 경우 해당 값은 여전히 HTTP를 통해 전송됩니다.
일반/보안 헤더에 대한 YAML 예시는 다음과 같습니다.
jsonData:
  httpHeaders:
  - name: X-Example-Plain-Header
    value: plain text value
    secure: false
  - name: X-Example-Secure-Header
    # "value" is excluded
    secure: true
secureJsonData:
  secureHttpHeaders.X-Example-Secure-Header: secure header value
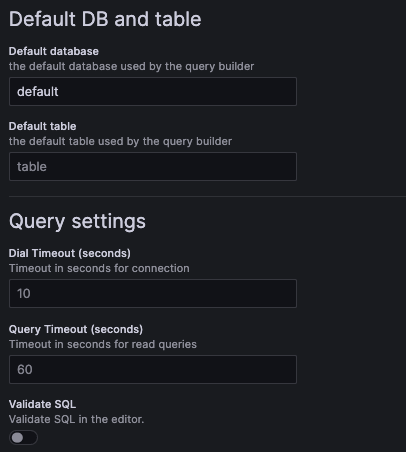
추가 설정
다음 추가 설정은 선택 사항입니다.
YAML 예시:
jsonData:
  defaultDatabase: default # default database loaded by the query builder. Defaults to "default".
  defaultTable: <string>   # default table loaded by the query builder.

  dialTimeout: 10    # dial timeout when connecting to the server, in seconds. Defaults to "10".
  queryTimeout: 60   # query timeout when running a query, in seconds. Defaults to 60. This requires permissions on the user, if you get a permission error try setting it to "0" to disable it.
  validateSql: false # when set to true, will validate the SQL in the SQL editor.
OpenTelemetry
OpenTelemetry (OTel)은 플러그인에 깊이 통합되어 있습니다.
OpenTelemetry 데이터는 exporter plugin을 사용하여 ClickHouse로 내보낼 수 있습니다.
최적으로 사용하려면 logs와 traces에 대해 모두 OTel을 구성하는 것이 좋습니다.
강력한 관측성 워크플로를 가능하게 하는 기능인 data links를 활성화하려면 이러한 기본값을 구성해야 합니다.
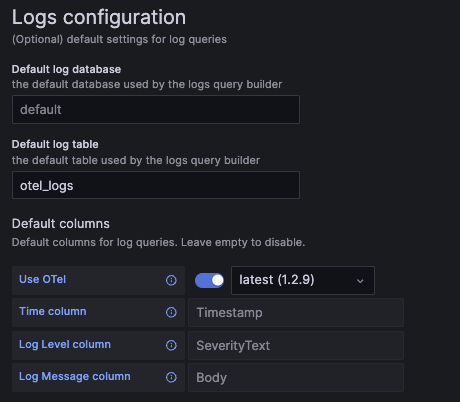
로그용 쿼리 빌더의 속도를 높이려면, 기본 데이터베이스/테이블과 로그 쿼리에 사용할 컬럼을 설정할 수 있습니다. 이렇게 하면 실행 가능한 로그 쿼리가 쿼리 빌더에 미리 채워져, 탐색(Explore) 페이지에서 관측성 워크플로를 더 빠르게 수행할 수 있습니다.
OpenTelemetry를 사용하는 경우 "Use OTel" 스위치를 활성화하고 기본 로그 테이블을 otel_logs로 설정해야 합니다.
이렇게 하면 선택한 OTel 스키마 버전에 맞게 기본 컬럼 구성이 자동으로 덮어써집니다.
로그에 OpenTelemetry가 필수는 아니지만, 단일 로그/트레이스 데이터셋을 사용하면 데이터 연결(data linking)을 통해 더 매끄러운 관측성 워크플로를 구현하는 데 도움이 됩니다.
로그 구성 화면 예시:
로그 구성 YAML 예시:
jsonData:
  logs:
    defaultDatabase: default # default log database.
    defaultTable: otel_logs  # default log table. If you're using OTel, this should be set to "otel_logs".

    otelEnabled: false  # set to true if OTel is enabled.
    otelVersion: latest # the otel collector schema version to be used. Versions are displayed in the UI, but "latest" will use latest available version in the plugin.

    # Default columns to be selected when opening a new log query. Will be ignored if OTel is enabled.
    timeColumn:       <string> # the primary time column for the log.
    levelColumn:   <string> # the log level/severity of the log. Values typically look like "INFO", "error", or "Debug".
    messageColumn: <string> # the log's message/content.
트레이스
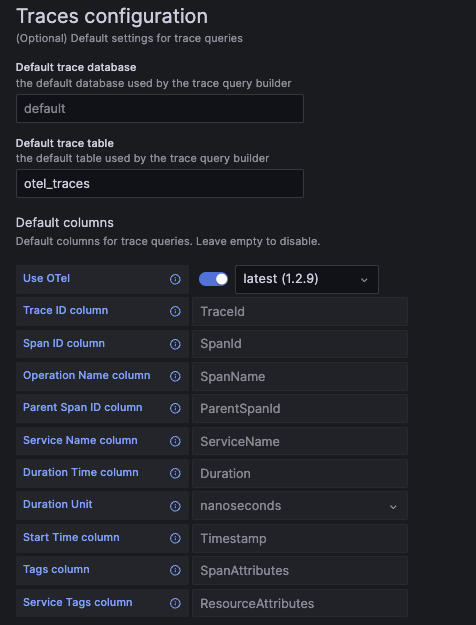
트레이스 쿼리 빌더의 속도를 높이기 위해 기본 데이터베이스와 테이블, 그리고 트레이스 쿼리에 사용할 컬럼을 설정할 수 있습니다. 이렇게 하면 쿼리 빌더에 바로 실행 가능한 트레이스 검색 쿼리가 미리 로드되어, 관측성을 위해 사용하는 Explore 페이지에서 데이터를 탐색하는 속도가 더 빨라집니다.
OpenTelemetry를 사용하는 경우 "Use OTel" 스위치를 활성화하고, 기본 트레이스 테이블을 otel_traces로 설정해야 합니다.
이렇게 하면 선택한 OTel 스키마 버전에 맞게 기본 컬럼 구성이 자동으로 재설정됩니다.
OpenTelemetry가 필수는 아니지만, 이 기능은 트레이스에 해당 스키마를 사용할 때 가장 잘 동작합니다.
트레이스 설정 화면 예시:
트레이스 설정 YAML 예시:
jsonData:
  traces:
    defaultDatabase: default  # default trace database.
    defaultTable: otel_traces # default trace table. If you're using OTel, this should be set to "otel_traces".

    otelEnabled: false  # set to true if OTel is enabled.
    otelVersion: latest # the otel collector schema version to be used. Versions are displayed in the UI, but "latest" will use latest available version in the plugin.

    # Default columns to be selected when opening a new trace query. Will be ignored if OTel is enabled.
    traceIdColumn:       <string>    # trace ID column.
    spanIdColumn:        <string>    # span ID column.
    operationNameColumn: <string>    # operation name column.
    parentSpanIdColumn:  <string>    # parent span ID column.
    serviceNameColumn:   <string>    # service name column.
    durationTimeColumn:  <string>    # duration time column.
    durationUnitColumn:  <time unit> # duration time unit. Can be set to "seconds", "milliseconds", "microseconds", or "nanoseconds". For OTel the default is "nanoseconds".
    startTimeColumn:     <string>    # start time column. This is the primary time column for the trace span.
    tagsColumn:          <string>    # tags column. This is expected to be a map type.
    serviceTagsColumn:   <string>    # service tags column. This is expected to be a map type.
컬럼 별칭
컬럼 별칭은 동일한 데이터를 서로 다른 이름과 타입으로 쿼리할 수 있게 해 주는 편리한 방법입니다.
별칭을 사용하면 중첩된 스키마를 평탄화하여 Grafana에서 쉽게 선택할 수 있습니다.
다음과 같은 경우에 별칭이 특히 유용합니다.
- 스키마와 그 대부분의 중첩 속성/타입을 잘 알고 있는 경우
- 데이터를 Map(맵) 타입에 저장하는 경우
- JSON을 문자열로 저장하는 경우
- 선택한 컬럼을 변환하기 위해 함수를 자주 사용하는 경우
테이블에 정의된 ALIAS 컬럼
ClickHouse에는 컬럼 별칭 기능이 기본 제공되며 Grafana와 바로 함께 사용할 수 있습니다.
별칭 컬럼은 테이블에서 직접 정의할 수 있습니다.
CREATE TABLE alias_example (
  TimestampNanos DateTime(9),
  TimestampDate ALIAS toDate(TimestampNanos)
)
위 예제에서는 나노초 단위 타임스탬프를 Date 타입으로 변환하는 TimestampDate라는 별칭을 생성합니다.
이 데이터는 첫 번째 컬럼처럼 디스크에 저장되는 것이 아니라, 쿼리 실행 시점에 계산됩니다.
테이블에 정의된 별칭은 SELECT * 결과에는 포함되지 않지만, 서버 설정에서 이를 변경할 수 있습니다.
자세한 내용은 ALIAS 컬럼 타입에 대한 문서를 참고하십시오.
컬럼 별칭 테이블
기본적으로 Grafana는 DESC table의 응답을 기반으로 컬럼 제안을 제공합니다.
일부 경우에는 Grafana가 인식하는 컬럼을 완전히 재정의해야 할 수 있습니다.
이는 컬럼을 선택할 때 Grafana에서 스키마를 숨기는 데 도움이 되며, 테이블의 복잡도에 따라 사용자 경험을 향상시킬 수 있습니다.
테이블에 정의된 별칭을 사용하는 것보다 나은 점은, 테이블 자체를 변경하지 않고도 쉽게 업데이트할 수 있다는 것입니다.
일부 스키마에서는 항목이 수천 개에 이를 수 있으며, 이로 인해 기본 테이블 정의가 지나치게 복잡해질 수 있습니다.
또한 사용자가 무시하기를 원하는 컬럼을 숨길 수도 있습니다.
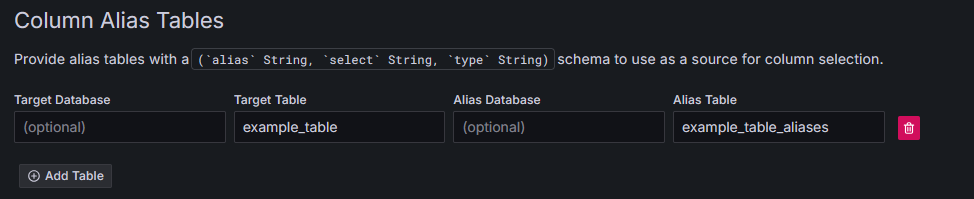
Grafana에서 별칭 테이블은 다음과 같은 컬럼 구조를 가져야 합니다:
CREATE TABLE aliases (
  `alias` String,  -- The name of the alias, as seen in the Grafana column selector
  `select` String, -- The SELECT syntax to use in the SQL generator
  `type` String    -- The type of the resulting column, so the plugin can modify the UI options to match the data type.
)
별칭 테이블을 사용하면 ALIAS 컬럼과 동일한 동작을 다음과 같이 구현할 수 있습니다:
CREATE TABLE example_table (
  TimestampNanos DateTime(9)
);

CREATE TABLE example_table_aliases (`alias` String, `select` String, `type` String);

INSERT INTO example_table_aliases (`alias`, `select`, `type`) VALUES
('TimestampNanos', 'TimestampNanos', 'DateTime(9)'), -- Preserve original column from table (optional)
('TimestampDate', 'toDate(TimestampNanos)', 'Date'); -- Add new column that converts TimestampNanos to a Date
이제 이 테이블을 Grafana에서 사용하도록 구성할 수 있습니다. 이름은 임의로 지정해도 되며, 별도의 데이터베이스에 정의해도 됩니다:
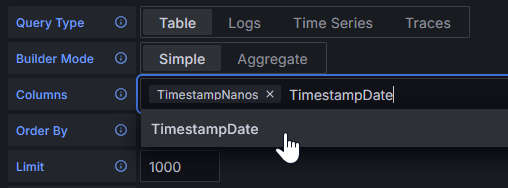
이제 Grafana는 DESC example_table 결과 대신 별칭 테이블의 결과를 사용합니다:
두 종류의 별칭 방식 모두 복잡한 타입 변환이나 JSON 필드 추출을 수행하는 데 사용할 수 있습니다.
모든 YAML 옵션
다음은 이 플러그인에서 제공하는 모든 YAML 구성 옵션입니다.
일부 필드는 예시값을 포함하며, 다른 필드는 필드의 유형만 보여 줍니다.
YAML로 데이터 소스를 프로비저닝하는 방법에 대한 자세한 내용은 Grafana 문서를 참조하십시오.
datasources:
  - name: Example ClickHouse
    uid: clickhouse-example
    type: grafana-clickhouse-datasource
    jsonData:
      host: 127.0.0.1
      port: 9000
      protocol: native
      secure: false
      username: default
      tlsSkipVerify: <boolean>
      tlsAuth: <boolean>
      tlsAuthWithCACert: <boolean>
      defaultDatabase: default
      defaultTable: <string>
      dialTimeout: 10
      queryTimeout: 60
      validateSql: false
      httpHeaders:
      - name: X-Example-Plain-Header
        value: plain text value
        secure: false
      - name: X-Example-Secure-Header
        secure: true
      logs:
        defaultDatabase: default
        defaultTable: otel_logs
        otelEnabled: false
        otelVersion: latest
        timeColumn: <string>
        levelColumn: <string>
        messageColumn: <string>
      traces:
        defaultDatabase: default
        defaultTable: otel_traces
        otelEnabled: false
        otelVersion: latest
        traceIdColumn: <string>
        spanIdColumn: <string>
        operationNameColumn: <string>
        parentSpanIdColumn: <string>
        serviceNameColumn: <string>
        durationTimeColumn: <string>
        durationUnitColumn: <time unit>
        startTimeColumn: <string>
        tagsColumn: <string>
        serviceTagsColumn: <string>
    secureJsonData:
      tlsCACert:     <string>
      tlsClientCert: <string>
      tlsClientKey:  <string>
      secureHttpHeaders.X-Example-Secure-Header: secure header value